How to Remove Personal Data From a Laptop Before Selling
Remove personal data from your laptop before selling it.
Yaskar Jung Shah
Senior Tech Writer
Key Takeaways
Remove personal data from your laptop before selling it.
How to Remove All Personal Data From a Laptop Before Selling
Why Deleting Files Is Not Enough
When you delete a file, the operating system does not erase the data from your hard drive or SSD. It only removes the pointer that tells the system where the file is stored. The data itself stays on the drive and can be recovered with free recovery software that is easy to use.
This means that the person who buys your laptop could potentially recover your deleted photos, documents, saved passwords, and files even after you think they are gone.
- A quick delete or format does not erase your data; it only hides it. Anyone with a free recovery tool can bring it back. The safest way to sell a laptop is to do a full factory reset and turn on drive encryption.
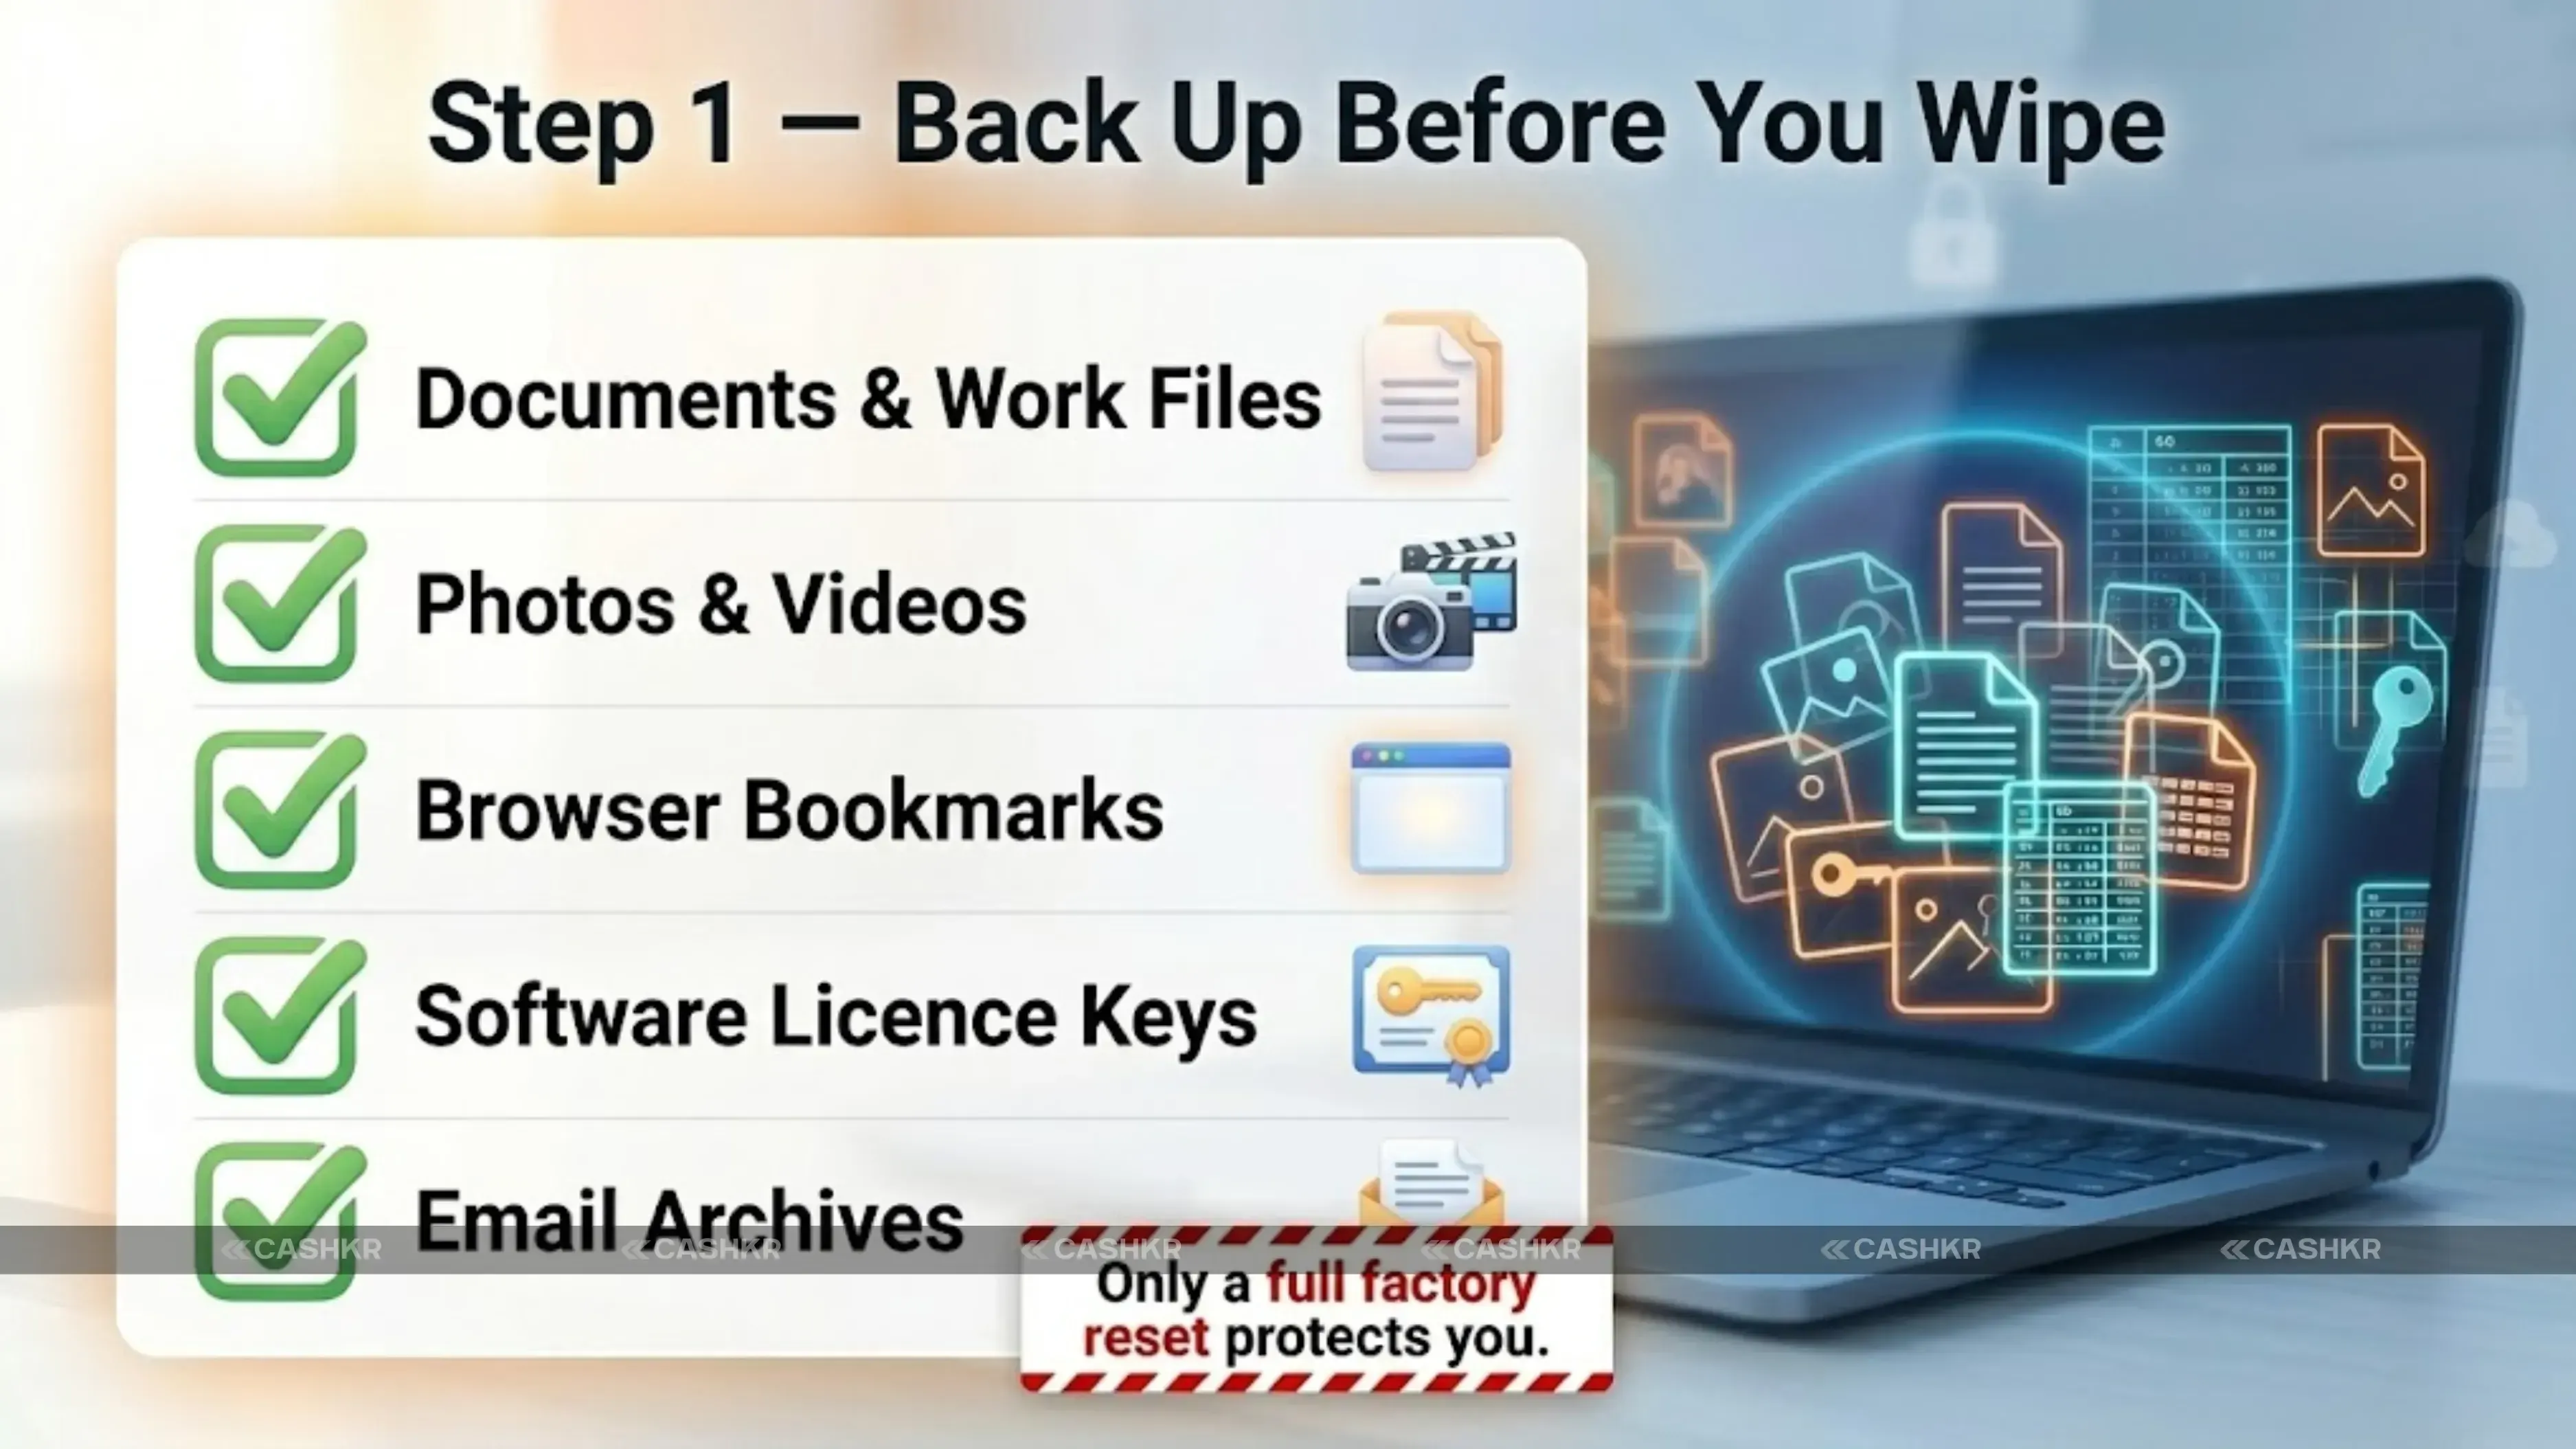
Step 1: Back Up Everything You Want to Keep
- All documents, spreadsheets, and work files: copy to an external hard drive or USB
- Photos and videos: back up to Google Photos, iCloud, or an external drive
- Desktop files and Downloads folder: easily forgotten but often contain important items
- Browser bookmarks: export from Chrome via Settings → Bookmarks → Export, or from Safari via File → Export Bookmarks
- Email archives: if you use a desktop email client like Outlook or Thunderbird, export your mailbox before resetting
- Software licence keys: note down any paid software licences you may need to reinstall on your new laptop
- TIP: Cloud storage services like Google Drive, OneDrive, and Dropbox automatically sync your files. If you use these, most of your documents may already be stored online. Check by logging in from another device to make sure everything is there before you wipe your laptop.
Also Read: Cashkr Old Phone Price Calculator | Check Phone Value Instantly
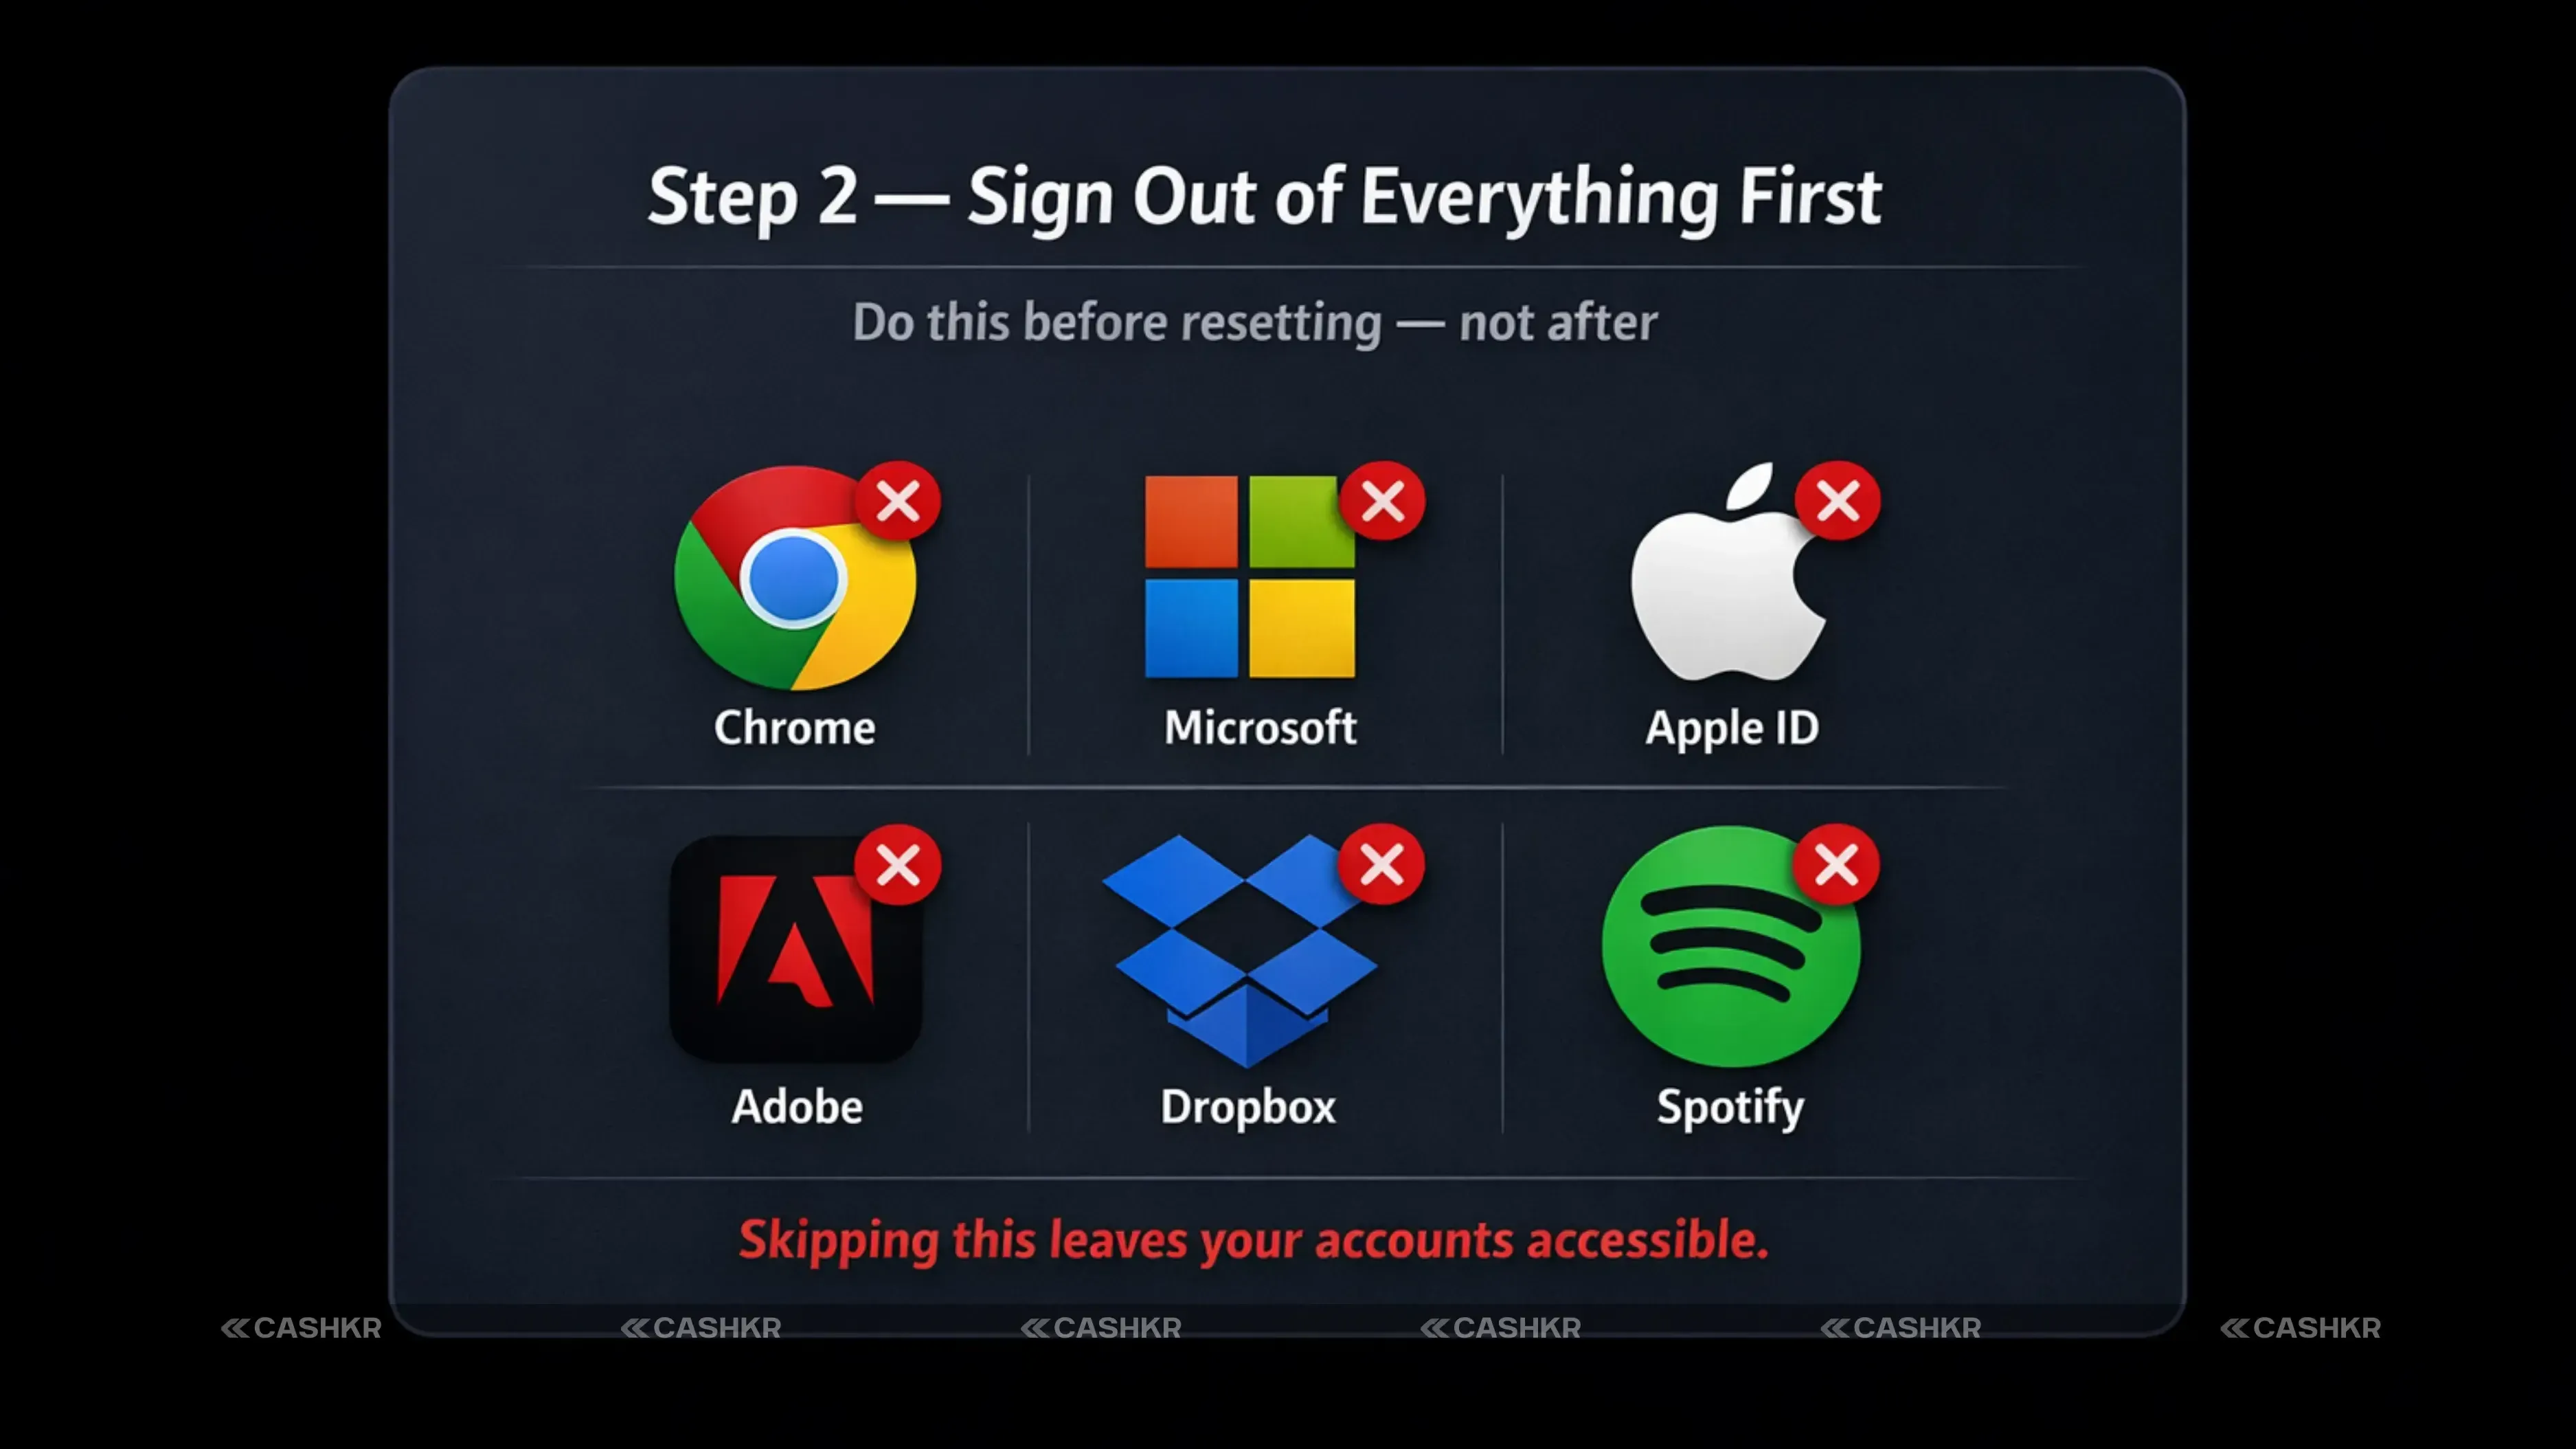
Step 2: Sign Out of All Accounts and Apps
- Google Chrome: click your profile picture in the top right → Turn off sync → turn off sync for all data. Then go to Settings → Privacy and Security → Clear browsing data → select All time → clear everything.
- Microsoft account (Windows): go to Settings → Accounts → Your Info → Sign in with a local account instead. This disconnects your Microsoft account from the laptop.
- Apple ID (Mac): go to System Preferences → Apple ID → Overview → Sign Out. This removes your account from iCloud, iMessage, FaceTime, and the App Store.
- Adobe Creative Cloud, Spotify, Microsoft Office, or any other paid software: sign out from within each app so your licence is freed up for use on another device.
- Email clients: if you use Outlook, Thunderbird, or Apple Mail, remove your accounts from within the app before resetting.
- In Dropbox, Google Drive, or OneDrive, right-click the icon in the system tray or menu bar and choose Sign Out or Quit. This stops sync and removes the local account.
- NOTE: If you use a password manager like LastPass, Bitwarden, or 1Password, sign out of it on the laptop but do not delete your account — your passwords are safely stored in the cloud and will be available on your new device.
Step 3: How to Factory Reset a Windows 10 or Windows 11 Laptop
- Recommended: Enable BitLocker before resetting (Windows 10/11 Pro)
- If your laptop uses Windows 10 or 11 Pro or Enterprise, you can use BitLocker. Turning it on before resetting encrypts your whole drive. When you reset and choose ‘Remove everything,' the encrypted data cannot be read without your key.
- Press the Windows key and search BitLocker
- Click "Manage BitLocker" and then "Turn on BitLocker."
- Follow the prompts; choose to save the recovery key to your Microsoft account or a USB drive
Wait for encryption to complete. This can take 30 minutes to a few hours, depending on drive size
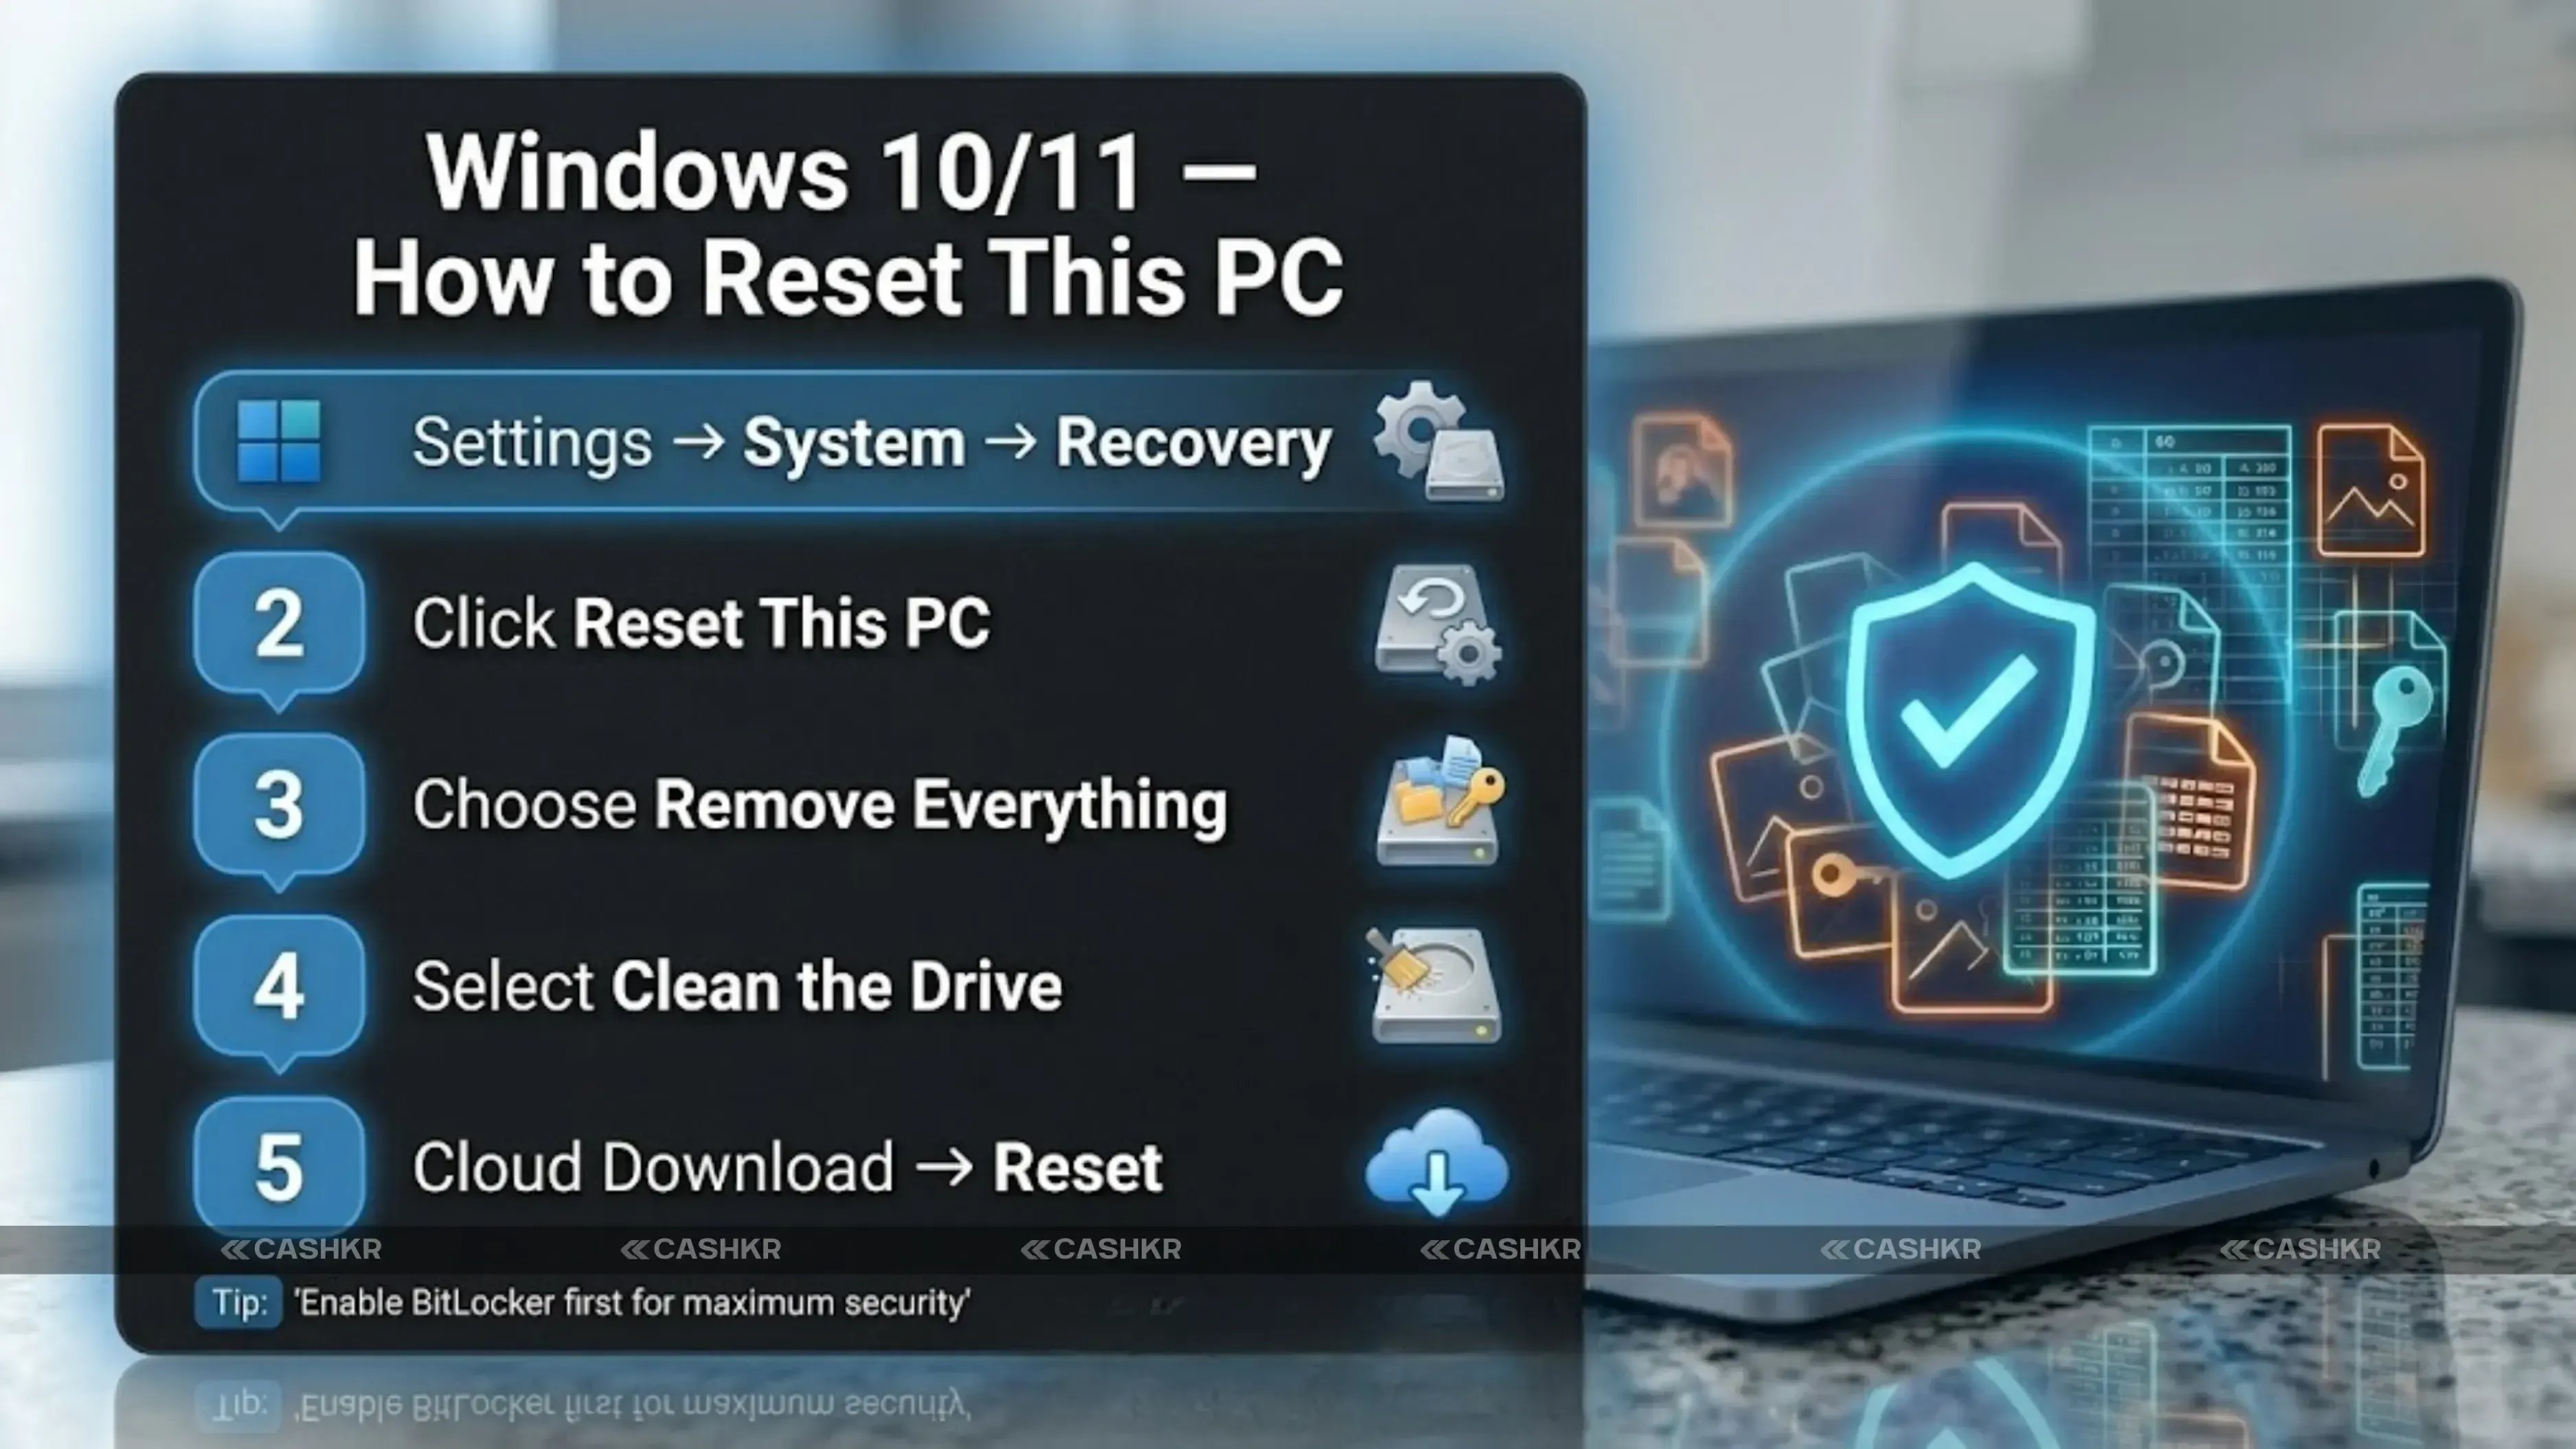
How to Reset this PC on Windows 10 and Windows 11:
Step 1: Open Windows Settings
Step 2: Go to System → Recovery
Step 3: Click Reset this PC
Step 4: Choose "Remove everything."
Step 5: Select how to reinstall Windows
Step 6: Choose ‘Remove files and clean the drive.'
Step 7: Click Reset and wait
- NOTE: If your laptop uses Windows 10 Home or Windows 11 Home and you do not have BitLocker, still choose ‘Remove files and clean the drive’ during the reset. This is not as secure as using BitLocker, but it is much better than just deleting files or doing a quick format.
Also Read: Top 10 Latest Acer Laptops Models 2025: Features & Specs
Step 3: How to Erase All Data From a MacBook Before Selling
Step 1: Open System Settings
Step 2: Go to General → Transfer or Reset
Step 3: Click Erase All Content and Settings
Step 4: Follow the Erase Assistant
Step 5: Click "Continue" and confirm
- For older MacBooks running macOS Big Sur or earlier:
- Restart the Mac and hold Command + R as it boots to enter Recovery Mode
- Select Disk Utility from the macOS Utilities menu
- Select your startup disk (usually called Macintosh HD) in the left panel
- Click Erase and choose the APFS or Mac OS Extended format
- After erasing, quit Disk Utility and select Reinstall macOS from the Utilities menu
- Follow the prompts to install a clean version of macOS
- TIP: Modern Macs use Apple’s T2 chip or Apple Silicon (M1, M2, M3, M4), which automatically encrypts storage. This makes erasing very thorough, as data is cryptographically destroyed and cannot be recovered, even with professional tools.
Windows vs Mac: Quick Comparison
| Feature | Windows 10 / 11 | macOS |
|---|---|---|
| Reset method | Settings → System → Recovery → Reset this PC | System Preferences → General → Transfer or Reset |
| Remove everything option? | Yes — "Remove everything" option available | Yes — Erase All Content and Settings |
| Encryption before reset? | Recommended — use BitLocker first | FileVault encrypts automatically on modern Macs |
| How long it takes | 30 minutes to 2 hours depending on drive size | 20 minutes to 1 hour on most MacBooks |
| Removes all accounts? | Yes — if "Remove everything" is selected | Yes — signs out of Apple ID automatically |
| Safe to sell after? | Yes — buyer gets a clean Windows setup | Yes — buyer goes through macOS Setup Assistant |
tep 4: What to Do After the Reset
- Remove the laptop from your Google account — go to myaccount.google.com → Security → Your Devices → find the laptop and click Remove.
- Remove the laptop from your Microsoft account — go to account.microsoft.com → Devices → find the laptop → Remove Device.
- Remove the Mac from iCloud — go to appleid.apple.com → Devices → click the MacBook → Remove from Account.
- If you still have them, gather the original charger, box, and accessories. These can add value to your sale.
- Clean the keyboard, screen, and body with a dry cloth. A clean laptop makes a better first impression and can help you get a higher offer on Cashkr.
- Get your serial number ready. For MacBooks, it is printed on the bottom. For Windows laptops, it is usually on a sticker on the base. You will need this number when getting a quote.
Complete Pre-Sale Checklist: Tick These Off Before You Sell
- 1. Backed up all documents, photos, and files to an external drive or cloud storage
- Exported browser bookmarks and noted any software license keys
- Signed out of Google Chrome, cleared all browsing data, and saved passwords
- Signed out of Microsoft account (Windows) or Apple ID (Mac)
- Signed out of Adobe, Spotify, Microsoft Office, and all other paid apps
- Signed out of Dropbox, Google Drive, OneDrive, and other cloud sync services
- Removed the laptop from the Google account, Microsoft account, or iCloud device list
- Completed factory reset: chose Remove everything (Windows) or Erase All Content (Mac)
- Selected the clean the drive option during reset (Windows) or confirmed Erase Assistant finished (Mac)
- Gathered original charger, accessories, and box if available
- Cleaned the screen and body with a dry cloth
- Located the serial number for the quote process
| Feature | DO THIS | AVOID THIS |
|---|---|---|
| Data safety | ✓ Back up your data before starting the reset | ✗ Think deleting files or emptying the Bin is enough |
| Account management | ✓ Sign out of all accounts before resetting | ✗ Skip signing out of Adobe or paid software licences |
| Reset option | ✓ Use “Remove everything” — not just “Keep my files” | ✗ Forget to export bookmarks and important documents |
| Security | ✓ Enable BitLocker before reset for extra security | ✗ Hand over the laptop with your Microsoft or Apple ID still active |
| Reinstallation | ✓ Choose Cloud download reinstall for a cleaner result | ✗ Rush the reset and interrupt it before it finishes |
| Ownership cleanup | ✓ Remove the laptop from your online account devices list | ✗ Forget to include the charger — it reduces the sale value |
| Final prep | ✓ Clean the laptop before handing it over | ✗ Use water or liquid to clean the keyboard or screen |
elling Your Laptop on Cashkr After Wiping It
Cashkr accepts all major laptop brands: Apple MacBook, Dell, HP, Lenovo, Asus, Acer, Microsoft Surface, and more.
After you accept the quote, a Cashkr pickup agent will come to your home at a time you choose. They will quickly check that the laptop works, matches the condition you described, and has been properly wiped. Payment is sent instantly to your UPI ID or bank account after verification.
- CASHKR TIP: If you are selling a MacBook, make sure your Apple ID is signed out, and the laptop is removed from your iCloud account before the pickup. A MacBook with Activation Lock still enabled cannot be verified and your payment will be delayed until the lock is cleared.
Final Verdict
The good news is that the process is simple. Back up what you need, sign out of all your accounts, do a full factory reset, and make sure the laptop is removed from your online accounts. Follow these four steps in order, and your data will be gone for good.
Once you have done that, Cashkr makes the selling part effortless. Get a quote in two minutes, schedule a free home pickup, and get paid the same day.
- Your old laptop is worth real money, and now you know exactly how to prepare it for sale the right way.
FAQs
1. Is it enough to just delete my files and empty the Recycle Bin before selling my laptop?
2. Does a factory reset permanently erase all my data?
3. What happens to my Microsoft Office or Adobe licence when I reset my laptop?
4. Do I need to reinstall Windows after wiping my laptop to sell it?
5. Can Cashkr accept my laptop even if I cannot reset it myself?
6. How do I find my laptop’s serial number for the Cashkr quote?
7. Does Cashkr accept laptops in damaged or non-working condition?
8. What should I do if I forgot my Windows or macOS password and cannot log in to reset it?
Yaskar Jung Shah
Senior Tech Writer
Yaskar Jung Shahis a technology enthusiast with over 5 years of experience covering AI, machine learning, and has contributed to major tech publications worldwide. He holds a Master's Degree in Computer Science from leading institutions.